aging-in-place-bathroom
Homeowners: Lock Blocking and Slope Before Style for Aging in Place
The single highest-impact change is a curbless or low-threshold shower paired with properly anchored grab bars, since bathrooms are where most older-adult falls happen. Pair that with a comfort-height toilet, slip-resistant flooring, and layered night lighting along the path to the bathroom. If you’re opening any walls for these changes, install blocking for future grab bars now. It costs almost nothing during construction and a lot more to add after the drywall goes back up.
TL;DR:
Installing solid blocking during wall construction costs little and simplifies future grab bar retrofits, preventing the need for extensive drywall repairs later.
A curbless or low-threshold shower significantly reduces fall risks, with a 60-inch turning radius recommended for wheelchair users and a budget-friendly option if full conversion isn’t possible yet.
Proper grab bar placement requires anchoring into wall blocking at key locations, avoiding drywall-only mounts that can fail during a fall.
Costs initially focus on safety upgrades like grab bars, lighting, and non-slip flooring, which are most effective for fall prevention and less expensive than full remodels.
Widening doorways to at least 32 inches and configuring fixtures for seated use are key design choices that improve safety without sacrificing aesthetics.
SolutionteamremodelingPlan A Safer, More Functional BathroomSolutionteamremodeling provides thoughtfully planned bathroom remodeling in Redmond, with skilled craftsmanship, premium materials, and honest pricing.Explore bathroom remodeling
Table of Contents
What Is an Aging-in-Place Bathroom, and Why Does It Start Here?
Room-by-Room: What to Decide in Each Zone
How Much Does an Aging-in-Place Remodel Cost?
The Technical Details a Contractor Should Never Skip
Making Accessible Design Look Intentional, Not Institutional
Why We Push Blocking and Slope Before We Push Style
Ready to Plan Your Aging-in-Place Bathroom?
Sources
FAQ
What Is an Aging-in-Place Bathroom, and Why Does It Start Here?
An aging-in-place bathroom is a bathroom redesigned so someone can bathe, use the toilet, and move around safely without help, regardless of changes in mobility, balance, or vision over time. The term matters because it’s not the same as a “handicap bathroom” or a strictly clinical accessible design. Done right, it looks like a normal, well-finished bathroom that happens to work for everyone in the house, at every stage of life. That distinction shapes every decision below.
Bathrooms carry the highest fall risk of any room in the home, and the CDC’s fall-prevention guidance points to four fixes that matter most: removing trip hazards, adding grab bars, improving lighting, and switching to non-slip surfaces. Everything else in an aging-in-place remodel builds on those four basics.
The shower: your biggest lever
A curbless, zero-threshold shower removes the tripping hazard that causes more bathroom falls than almost anything else. For wheelchair users, the National Association of Home Builders’ Certified Aging-in-Place Specialist (CAPS) program recommends a 60-inch turning radius, or an acceptable T-turn configuration where full clearance isn’t possible, along with a doorway at least 32 inches wide. If a full curbless conversion isn’t in this phase’s budget, a low-threshold shower (under half an inch) is a reasonable interim step.
Grab bars: placement beats hardware
A towel bar is not a grab bar. Real grab bars need to anchor into solid blocking, not just drywall anchors, and they need to sit where a hand actually reaches during a fall or a transfer, not wherever looks tidy. Standard placement zones include:
Inside the shower at 33 to 36 inches from the floor, positioned for someone bracing while stepping in or standing up from a bench.
Beside the toilet, both on the wall and as a floor-mounted or fold-down bar if there’s no adjacent wall.
Near the tub entry, angled to support the motion of stepping over or sitting down.
Toilets, flooring, and light
Comfort-height toilets (typically 17 to 19 inches to the seat) reduce strain on knees and hips, and a bidet attachment or heated seat adds independence for people with limited grip or reach. For flooring, look for tile or vinyl rated for wet-area slip resistance using a coefficient of friction (COF) rating, matte or textured finishes, and smaller-format tile in the shower, since more grout lines mean more traction underfoot. Skip glossy large-format tile in wet zones no matter how good it looks in the showroom.
Lighting should work in layers: general ceiling light, task lighting at the mirror and shower, and a dim night light or motion-sensor path light for 2 a.m. trips. A handheld showerhead on a slide bar, paired with a built-in or teak bench, lets someone bathe seated. Pair it with a thermostatic anti-scald valve, which caps water temperature and prevents the scalding that can happen when someone with slower reflexes can’t adjust a faucet fast enough.
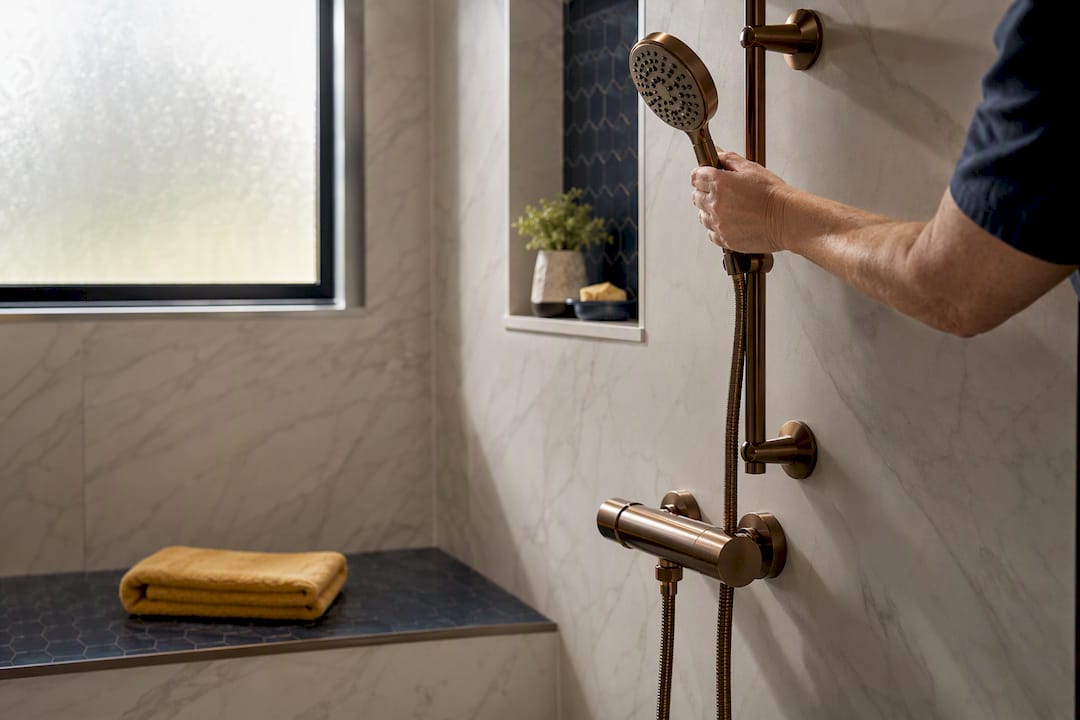
Pro Tip: Test grab bar placement with a broomstick and tape before the contractor cuts tile. Stand where you’d actually brace yourself, mark the height, and you’ll catch placement mistakes that blueprints miss.
Room-by-Room: What to Decide in Each Zone
Every zone in the bathroom has its own set of decisions, and skipping one usually means a second round of work later.
Shower or tub. Choose curbless over walk-in tub when possible. A curbless shower with a bench, handheld sprayer, and either a linear or center drain (matched to your slope plan) works for both standing and seated bathing. Walk-in tubs solve soaking preferences but create their own step-over hazard and take longer to fill and drain.
Toilet. Target a 17 to 19 inch seat height, with grab bars positioned within easy reach on at least one side, and keep 18 inches of clear floor space beside the bowl for a walker or transfer.
Flooring. Confirm the COF rating on any wet-area material, use a beveled or flush transition strip at doorways instead of a raised threshold, and skip throw rugs entirely. A loose rug on tile is one of the most common preventable fall triggers in an otherwise well-designed bathroom.
Doors and circulation. Widen the doorway to at least 32 inches of clear width. A pocket door or an outswing door frees interior floor space and, importantly, lets someone open the door from outside if a person falls against it, which an inswing door won’t allow.
Vanity and storage. Lower at least one vanity section for seated use, or leave open knee space beneath it. Keep daily-use items (towels, toiletries, medications) between waist and shoulder height so nobody has to bend or stretch.
Ventilation. Size the exhaust fan to the room’s square footage and run time, since excess humidity speeds mold growth and makes flooring slicker. A humidity-sensing fan that runs automatically is a small upgrade that pays off daily.
How Much Does an Aging-in-Place Remodel Cost?
Budget in phases, not all at once. Trying to do everything in a single project usually means either overspending or cutting corners on the pieces that matter most.
Phase one, immediate safety items: grab bars, a raised or comfort-height toilet seat, non-slip mats or strips, and better lighting. These are the lowest-cost, highest-return changes, and the AARP’s guidance on affordable aging-in-place upgrades treats them as the sensible starting point for most households.
Phase two, mid-level updates: new slip-resistant flooring, a handheld shower and bench, reachable storage reconfiguration.
Phase three, full remodel: curbless shower conversion, plumbing relocation, and structural blocking. This is where costs climb fastest, since it often involves moving drains, reframing walls, and re-tiling the whole room.
Costs vary by region, material choice, and whether plumbing needs to move, so treat any number you see as a starting range rather than a quote. What’s consistent across the phased approach AARP outlines is that blocking installed during any wall-open phase is inexpensive relative to retrofitting it later, when a contractor has to cut open finished walls just to add an anchor point.
When you interview contractors, ask directly whether they have Certified Aging-in-Place Specialist (CAPS) training or comparable experience. Ask for photos or documentation of past blocking installations, and ask how they calculate shower slope on curbless designs. A contractor who can answer those questions specifically, rather than generally, is the one worth hiring for this kind of work.
The Technical Details a Contractor Should Never Skip
These are the items that don’t show up in a finished photo but decide whether the remodel holds up in five years.
Blocking. Install horizontal wood blocking in the wall cavity at every planned grab bar location, even ones you’re not installing yet. Photograph the blocking with a tape measure visible in the frame before it disappears behind drywall, since that photo is what makes a future retrofit a one-day job instead of a wall-opening project.
Shower slope and drainage. A curbless or linear-drain shower depends entirely on correct floor slope. Have the contractor document slope elevations before tile goes down. Get this wrong and water migrates outside the shower footprint, which shows up months later as soft flooring or hidden mold.
Door framing. Decide on pocket or outswing framing before drywall goes up. Reframing a doorway after the fact means new drywall, new trim, and usually new paint.
Rough plumbing. Set the water line and valve location for a handheld sprayer, and install the thermostatic anti-scald valve at rough-in. Set the toilet flange height to match your target comfort-height seat.
Electrical. Pre-wire for motion-sensor night lighting and leave a low-voltage line for future smart controls, even if you’re not installing them yet. Running wire through an open wall costs a fraction of what it costs once the wall is finished.
Pro Tip: Ask your contractor to email you the blocking photos and slope documentation as a PDF the same week the work happens. Paper gets lost in a moving box; a dated email does not.
Making Accessible Design Look Intentional, Not Institutional
Grab bars and comfort-height fixtures don’t have to read as medical equipment. Matched-finish hardware, in the same brushed nickel or matte black as your faucet and towel bar, blends grab bars into the room instead of flagging them as an add-on.
Choose a matte or lightly textured tile in a warm tone rather than the cold, glossy white most people associate with clinical bathrooms.
Build the shower bench as a design feature, a floating teak seat or a tiled bench that matches the surrounding wall, rather than a plastic add-on.
Layer lighting around the mirror and vanity so the room feels warm at night, not floodlit.
Coordinate cabinet pulls, faucet finish, and grab bar finish as one palette instead of buying each piece separately.
The AARP notes that curbless showers, done with correct slope and waterproofing, often read as an upscale design choice rather than a retrofit, and that same principle applies to the room as a whole. A well-finished accessible bathroom tends to appeal to a broader pool of future buyers, since walk-in showers and zero-step entries have become a mainstream preference, not just an accessibility feature.
Why We Push Blocking and Slope Before We Push Style
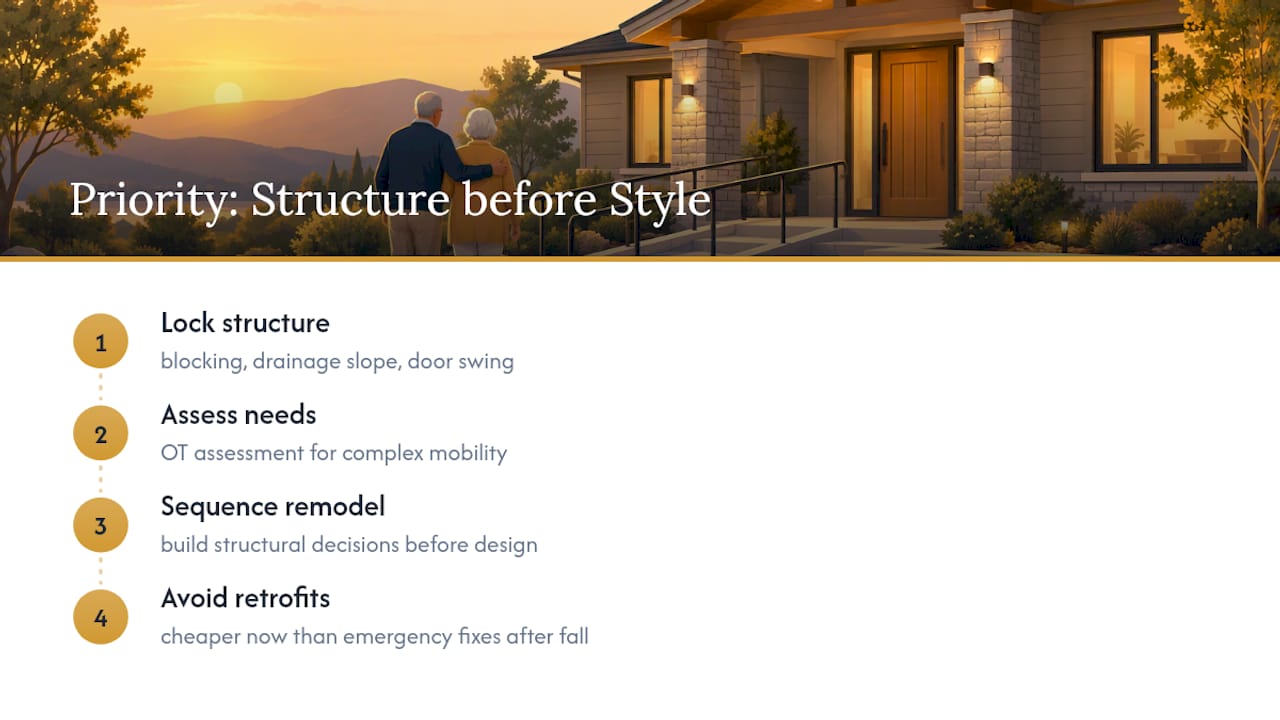
Most remodel guides lead with tile and fixtures because that’s the fun part to shop for. We’d argue the opposite order matters more: get the blocking, the drainage slope, and the door swing right first, because those are the choices you can’t easily undo. Style choices you can change again in ten years. A wall without blocking, you’re opening drywall to fix.
The trade-off homeowners underestimate is timing. Waiting until someone in the household actually needs a grab bar means retrofitting under pressure, often after a fall already happened. Building the blocking in now, during a routine remodel, costs a fraction of that emergency fix. An occupational therapy home assessment is worth scheduling if anyone in the home has complex mobility or transfer needs; it catches placement details a general contractor won’t think to ask about. A professional bathroom remodel team approaches remodels with the sequencing logic of locking in the structural and drainage decisions first, then building the design layer on top of a foundation that won’t need to be reopened in five years.
— Vlad
Ready to Plan Your Aging-in-Place Bathroom?
If you’ve read this far, you already know the hard part isn’t picking tile. It’s getting the blocking, slope, and door framing right the first time, which is exactly where a general handyman crew tends to cut corners and a dedicated remodeling team doesn’t. A dedicated remodeling team can handle bathroom remodeling, tile and waterproofing, plumbing coordination for handheld sprayers and anti-scald valves, and structural blocking work under one contract instead of three separate subcontractors you’d have to manage yourself.
A professional remodeling team typically works on licensed, insured projects for homeowners in their service area, with transparent pricing and no pressure to upsell beyond what your bathroom actually needs. If you’re weighing a curbless shower conversion or just want a second opinion on a contractor’s blocking plan, you can review past bathroom and tile projects or start with a free consultation on your bathroom remodel to get a realistic scope and timeline before you commit to anything.
Sources
CDC fall-prevention checklist, AARP renovation improvements guide, NAHB CAPS remodeling checklist.
AARP — Home fit: dollars and sense — Aging-in-place bathroom cost and blocking guidance
CDC — Preventing falls and hip fractures — Older adult fall prevention
FAQ
What Makes a Bathroom Truly “Aging in Place”?
It combines a curbless or low-threshold shower, anchored grab bars, comfort-height fixtures, slip-resistant flooring, and clear 32 inch door openings so someone can use it safely without assistance. The goal is a bathroom that adapts to changing mobility rather than one built around a single fixed need.
Do I Need a Permit for a Curbless Shower Conversion?
Most jurisdictions require a permit for a curbless shower because it involves moving plumbing and altering the subfloor slope. Check with your local building department before work starts, and confirm your contractor is pulling permits rather than skipping that step.
How Much Does It Cost to Remodel a Bathroom for Aging in Place?
Costs vary widely depending on whether the project stays at safety upgrades (grab bars, lighting, non-slip mats) or expands into a full curbless shower conversion with moved plumbing. Solution Team Remodeling doesn’t publish fixed bathroom remodel pricing online, since scope varies by home; you can request a free estimate through the Solution Team Remodeling site for a number specific to your bathroom.
Should I Install Grab Bars Myself or Hire a Professional?
Grab bars need to anchor into solid wall blocking rated to hold real body weight during a fall, not just drywall anchors, which makes this a job for someone experienced in locating studs or blocking correctly. If your walls don’t already have blocking in the right spots, this becomes a professional job rather than a weekend project.
What’s the First Thing I Should Fix if I Can Only Afford One Change?
Grab bars, better lighting, and non-slip flooring surfaces top the CDC’s fall-prevention priorities and cost far less than a full shower conversion. Start there, then plan the curbless shower and structural blocking as a later phase once budget allows.
Recommended
Back to Blog
