bathroom-remodel-timeline
Finish Sooner: Homeowners’ Bathroom Remodel Timeline and Two Schedules
Most homeowners finish a cosmetic bathroom refresh in about one to two weeks, a partial remodel in several weeks, and a full gut renovation in a longer time, often multiple weeks. The three biggest swing factors are permit and inspection wait times, long-lead materials like custom tile or glass enclosures, and hidden problems behind the walls.
TL;DR:
Permit and inspection delays can add several weeks to the overall timeline, especially for full gut renovations involving layout changes.
Custom tile, countertops, and specific fixtures often require two to six weeks for fabrication and delivery, which should be ordered during pre-construction.
Managing long-lead items and permits early, along with detailed scheduling, can reduce project delays caused by supply chain issues and approval wait times.
Relocating plumbing or fixtures significantly extends the timeline and should be planned with input from licensed trades before finalizing designs.
Hidden water damage and waterproofing shortcuts are common causes of unexpected delays, emphasizing the need for thorough pre-inspections and proper installation.
SolutionteamremodelingPlan Your Bathroom Remodel ClearlySolution Team Remodeling combines thoughtful planning, skilled craftsmanship, and organized scheduling for bathroom updates in Redmond, WA.Plan your remodel
Table of Contents
Bathroom Remodel Timeline at a Glance
What Happens in Each Phase of a Bathroom Remodel?
How Do Permits Affect Your Remodel Schedule?
DIY, Trade-by-Trade, or Full-Service: How Your Approach Changes the Clock
How Do You Build a Realistic Remodel Calendar?
What Usually Causes Bathroom Remodel Delays?
A Homeowner Checklist and Two Sample Schedules
Why Local Experience Shortens the Timeline
Living Through the Remodel: What Actually Matters
Get a Schedule-Focused Estimate From Solutionteamremodeling
Sources
FAQ
Bathroom Remodel Timeline at a Glance
Your project’s scope decides your calendar more than almost anything else. A cosmetic refresh, swapping fixtures, repainting, replacing a vanity, keeps the existing layout intact, so there’s no rough plumbing or framing work to slow things down. A full gut job resets everything to studs and subfloor, which pulls in permits, multiple inspections, and a longer string of trades.
Here’s the rough breakdown contractors use when scoping a bathroom remodel timeline for a client:
Cosmetic refresh (paint, fixtures, vanity swap, no layout changes): 3 to 10 working days, often finished in a single week if materials are on hand.
Partial remodel (new tile, tub-to-shower conversion, updated fixtures, same footprint): 3 to 6 weeks including permit review.
Full gut remodel (layout changes, new plumbing/electrical runs, structural work): 6 to 10+ weeks, with permits and inspections often accounting for a third of that span.
Working days and calendar weeks aren’t the same thing. A contractor might log 20 actual working days on a partial remodel, but the project stretches to five or six calendar weeks once you factor in inspection wait times and the day or two between trades. DIY projects follow a different curve entirely. A skilled do-it-yourselfer can knock out a cosmetic refresh over a long weekend, but a full DIY remodel typically takes two weeks to a month for someone with real experience, and considerably longer for a first timer learning as they go.
What Happens in Each Phase of a Bathroom Remodel?
Every remodel moves through the same basic sequence, whether it’s a small powder room or a primary suite. Understanding where each phase sits on the calendar helps you spot the tasks that are actually holding up your finish date versus the ones that can run in parallel.
Pre-construction (1 to 3 weeks). This covers design finalization, material selections, and signing the contract. Homeowners routinely underestimate this phase because it feels like “just planning,” but indecision on tile, fixtures, or layout here is the single easiest place to lose two or three weeks before demo even starts. You compress it by finalizing selections before you sign, not after.
Demolition (1 to 3 days). Crews protect adjacent flooring and hallways, then tear out old fixtures, tile, and sometimes drywall down to the studs. A small refresh demo might take an afternoon; a full gut with tile removal and subfloor inspection can run two to three days, especially if what’s behind the walls doesn’t match the original plans.
Rough-in (3 to 7 days). Framing changes, plumbing relocations, and electrical rerouting happen here, in that order, because you can’t run wire through a wall you haven’t framed yet. This is also where you schedule your first inspection.
Inspections (1 to 5+ days of waiting, sometimes more). Rough-in inspections for plumbing and electrical typically get scheduled within a few days of the request, but local backlogs vary. Sweeten’s bathroom renovation timeline research puts overall construction periods at roughly 20 to 30 working days, with total project time commonly landing between six weeks and three months once permits are factored in. Budget extra time in case something fails and needs a re-inspection.
Tile and finish installation (1 to 3 weeks). Tile setting, grout curing (which needs real time, not just overnight), cabinet installation, and countertop templating and fabrication happen here. This phase often determines your actual finish date more than any other, because custom countertops alone can take one to two weeks to fabricate after templating.
Fixtures, testing, and punch list (2 to 5 days). Faucets, toilets, mirrors, and hardware go in last. Everything gets tested, water pressure, drain flow, ventilation, and you walk the space with your contractor to catch anything that needs touching up before you move back in.
Pro Tip: Ask your contractor for the countertop fabrication lead time before demo starts, not after. A two-week fabrication window that starts late is the single most common reason a “six-week remodel” turns into eight.
How Do Permits Affect Your Remodel Schedule?
Permits are usually the longest fixed-duration item on the whole project, and they’re also the one homeowners have the most control over shortening. Jurisdictions reviewing plumbing, electrical, or structural changes often take four to eight weeks or more to approve permit applications, and that clock doesn’t care how eager you are to start demo.
A few things reliably speed this up:
File as soon as your plans are near-final. You don’t need every tile selection locked in to submit permit-ready plumbing and electrical drawings, so start the application while you’re still finalizing finishes.
Have your contractor submit the paperwork. Experienced local contractors know exactly what your city’s inspectors want to see, which cuts down on the back-and-forth that stalls a lot of homeowner-submitted applications.
Consider staged permits for larger projects, so plumbing and electrical work can start once those specific approvals clear, rather than waiting on every permit in the package.
Do a pre-inspection walkthrough with your contractor before the official inspection. Catching a missed junction box cover or an unsupported vent run yourself saves the days a failed inspection adds back onto your schedule.
When an inspection does fail, you’re not just losing the day. You’re waiting for the next open slot on the inspector’s calendar, which can be another few days to a week depending on your city’s volume.
DIY, Trade-by-Trade, or Full-Service: How Your Approach Changes the Clock
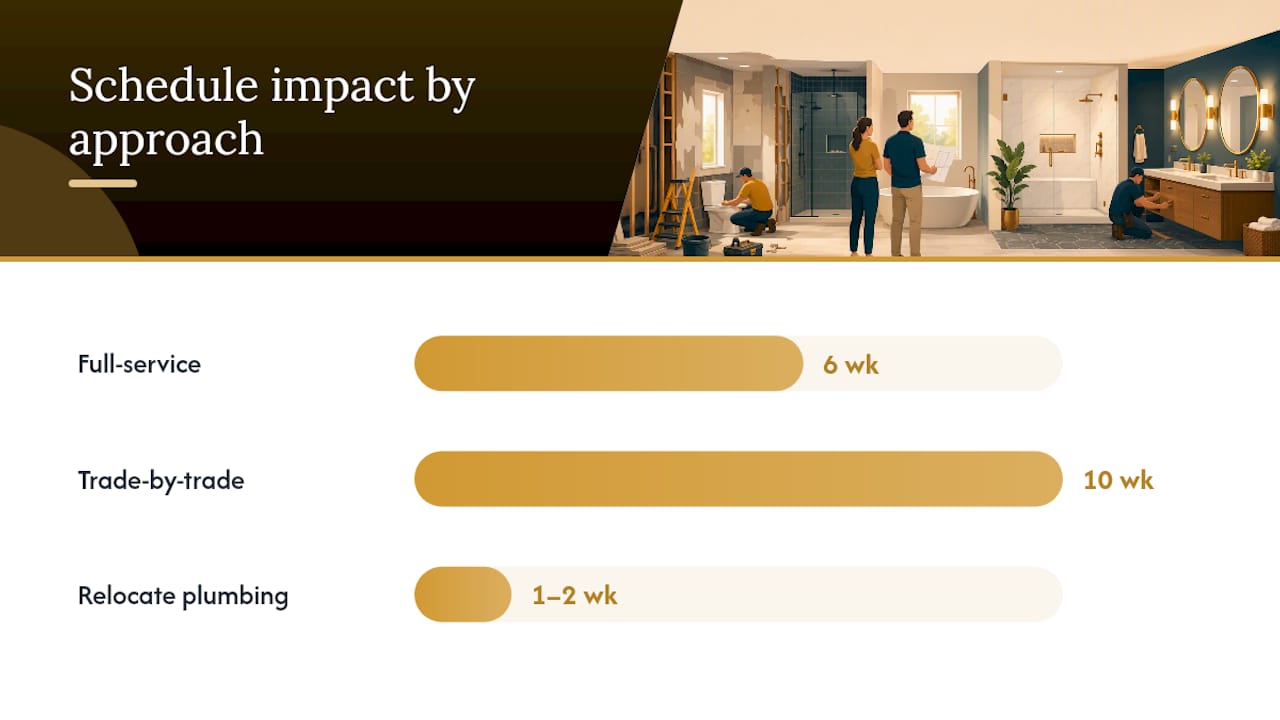
The person managing your project affects your timeline almost as much as the scope does. Handling demo, painting, or fixture swaps yourself can save real money without touching your critical path, since those tasks don’t gate anything downstream. But once you start hiring individual trades separately, plumber this week, electrician next week, tile setter whenever he’s free, you inherit all the scheduling coordination yourself, and that’s where projects quietly stretch from six weeks to ten.
DIY-friendly tasks: demo, painting, hardware installation, simple fixture swaps.
Tasks best left to licensed trades: anything touching supply lines, drain lines, or electrical circuits, both for safety and because most permits require licensed work anyway.
The single biggest time cost: relocating plumbing or fixture locations. Moving a toilet flange or shower drain even a few feet means new rough-in work, new inspections, and often a redesign of the subfloor, easily adding one to two weeks versus keeping the existing footprint.
A full-service contractor earns their fee largely through scheduling. They line up the plumber, electrician, tile setter, and inspector in sequence so nobody’s waiting on someone else’s unfinished work, which is exactly the kind of coordination friction that eats weeks on owner-managed projects.
Pro Tip: If you’re set on changing your layout, get your plumber’s input before you finalize the design. A shifted drain location that looks simple on paper can require breaking into a concrete slab, which changes your timeline by days, not hours.
How Do You Build a Realistic Remodel Calendar?
Planning your bathroom renovation schedule around order-by dates, not start dates, prevents the most common hold-up: showing up to install day without the material.
Order long-lead items first. Custom cabinetry, specialty tile, and glass shower enclosures can take two to six weeks to arrive after ordering, so lock these in during pre-construction, well before demo begins.
Sequence your milestone sign-offs. Design approval, permit submission, material ordering, and demo start should each have a target date on a shared calendar you and your contractor both check.
Time your start for the season. Contractor availability tightens up in spring and early summer, and permit offices can get backed up during the same stretch, so starting in late fall or winter often means faster scheduling on both fronts.
Hold a pre-construction meeting. Walk through utility shutoff windows, site access, and exactly how many days you’ll be without a working bathroom. The NAHB recommends this step specifically because it prevents the disputes and surprises that come from mismatched expectations mid-project.
What Usually Causes Bathroom Remodel Delays?
Almost every blown schedule traces back to one of four problems, and all four are manageable if you plan for them upfront.
Hidden water damage or mold. Older bathrooms often hide moisture damage behind tile that only surfaces during demo. The EPA’s mold cleanup guidance outlines remediation steps that can add real time, so budget a contingency window rather than assuming the walls are clean.
Waterproofing shortcuts. Skipping a proper membrane or using the wrong adhesive in a shower causes failures that show up months later and require tearing everything back out. BuildingAdvisor is blunt about this: mastic doesn’t belong in wet areas, and cutting this corner to save two days now can cost two weeks of rework later.
Backordered materials. Supply chain hiccups on tile, vanities, or fixtures are common enough that you should have a backup selection ready if your first choice slips.
Inspection failures. Working with code-compliant installers and doing your own pre-inspection walkthrough catches most issues before the inspector does.
A Homeowner Checklist and Two Sample Schedules
Before demo day, finalize your fixture and tile selections, confirm your permit is filed, and set a firm date for when the bathroom goes offline.
Two-week cosmetic refresh:
Days 1 to 2: Demo old fixtures and prep surfaces.
Days 3 to 7: Paint, install new vanity and flooring.
Days 8 to 10: Set new fixtures, hardware, and mirror.
Six-to-eight-week full remodel:
Weeks 1 to 2: Pre-construction, permit filing, material ordering.
Weeks 3 to 4: Demo and rough-in, with inspection scheduled at the end of week 4.
Weeks 5 to 6: Tile and finish installation, plus a 3-day buffer for grout curing.
Weeks 7 to 8: Fixtures, final inspection, and punch list.
Adjust either template based on whether your layout is changing, since that adds rough-in and inspection time to both.
Why Local Experience Shortens the Timeline
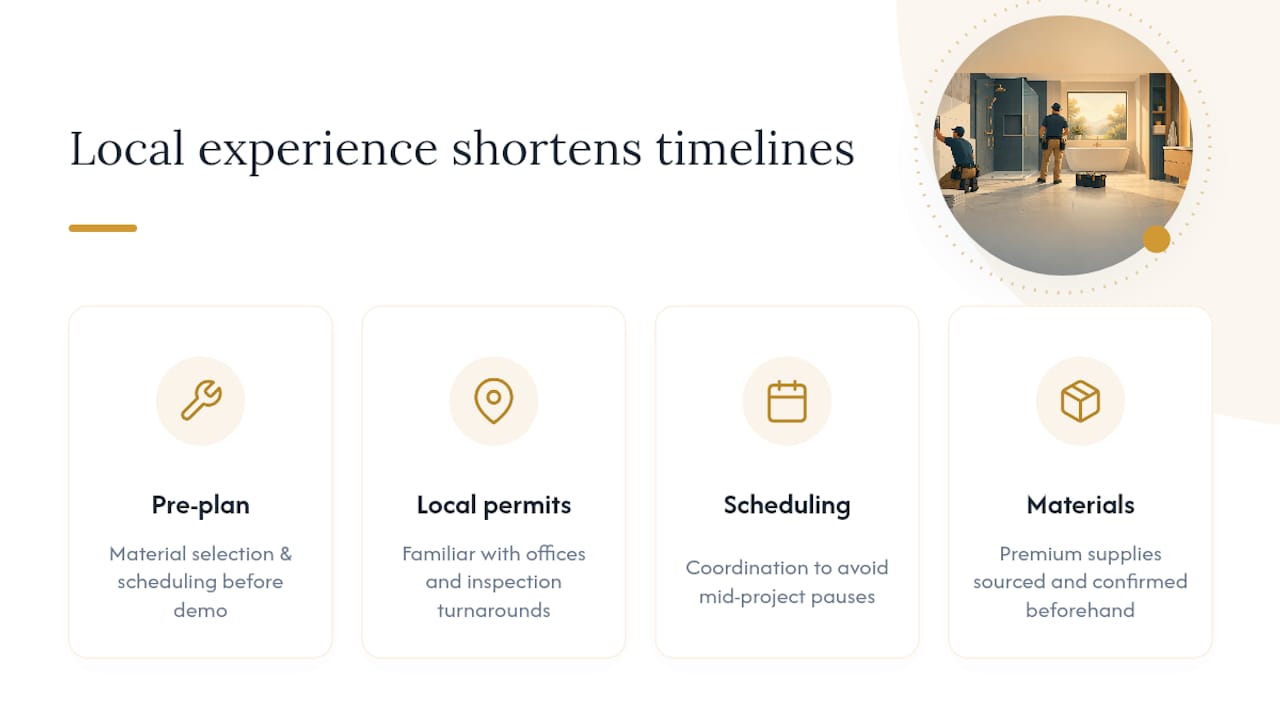
A contractor’s grip on pre-construction planning often matters more than crew size. The contractor structures projects around upfront material selection and scheduling coordination specifically to avoid the mid-project pauses that stretch timelines. Working across Redmond, Sammamish, Seattle, and Bothell means familiarity with local permit offices and inspection turnaround, which shortens the guesswork that trips up out-of-area crews on permit-heavy projects. Reliable scheduling and premium materials, sourced and confirmed before demo starts, keep timelines closer to plan than usual.
Living Through the Remodel: What Actually Matters
Anyone who has been without a working bathroom for six weeks knows the stress isn’t the timeline itself. It’s not knowing which milestone you’re waiting on. Track the schedule by phase, not by days remaining, and the wait gets a lot more bearable.
— Vlad
Get a Schedule-Focused Estimate From Solutionteamremodeling
Most remodel delays trace back to one thing: nobody locked in the schedule before the sledgehammer came out. Building every project around a pre-construction process that finalizes selections, orders long-lead materials, and lines up permits before demo day helps avoid discovering material backorders mid-project.

If you’re planning a remodel in Redmond or the surrounding area, request a scheduling-focused estimate through the main Solutionteamremodeling page or browse the full service catalog to see how tile, flooring, and fixture work get coordinated under one calendar instead of three separate contractor schedules. A pre-construction meeting up front is the fastest way to find out whether your timeline expectations match reality, before you’re living without a bathroom longer than planned.
Sources
FAQ
How long does a typical bathroom remodel take?
A cosmetic refresh usually takes 1 to 2 weeks, a partial remodel runs 3 to 6 weeks, and a full gut renovation takes 6 to 10 weeks or more. Sweeten’s research puts the construction period at roughly 20 to 30 working days, with total project time often landing between six weeks and three months once permits are included.
What does a $10,000 bathroom remodel look like?
A budget around $10,000 typically covers a partial remodel: new tile, updated fixtures, a new vanity, and possibly a tub-to-shower conversion, without moving plumbing or changing the layout. Angi’s cost data shows that midrange remodels in this range generally take three to six weeks from demo to punch list.
Is $5,000 enough to remodel a bathroom?
A modest budget is realistic for a cosmetic refresh including new fixtures, paint, a vanity swap, and updated hardware, rather than a full renovation. Layout changes or new tile work throughout typically push costs well past that and extend the timeline accordingly.
What is the hardest part of a bathroom remodel?
Waterproofing is the phase where mistakes cause the most damage down the line. Skipping a proper membrane or using the wrong adhesive can cause failures that require tearing out finished tile, turning what looked like a finished bathroom back into a demo site weeks later.
Recommended
Back to Blog
