cabinet-hardware-placement
Stop Guessing: Jig Tested Cabinet Hardware Placement for Homeowners
Place knobs and short pulls about 2.5 to 3-inch from the door corner opposite the hinge, center pulls vertically on drawer fronts, and size drawer pulls to roughly one-third of the drawer’s width. Confirm the position with a paper template or a hardware jig, and mount a sample knob or pull before drilling anything permanent. These are the same reference points professional installers use to keep every door and drawer in a kitchen matching.
TL;DR:
Hardware should be placed 2 to 3 inches from the hinge side on cabinet doors, with the exact position adjusted for door height and style.
Pulls are best on wide or heavy-use drawers, measuring about one-third of the drawer width, often requiring two pulls on larger fronts.
Using a jig for consistent hole placement and measuring center-to-center spacing reduces misalignment and enhances the kitchen’s visual harmony.
Proper screw length and pre-testing on scrap material prevent damage and ensure hardware stays securely attached.
The trend for 2026 favors warmer, mixed-metal finishes, with a focus on tactile, substantial hardware that complements overall kitchen design.
SolutionteamremodelingPlan Your Kitchen Remodel With ConfidenceSolution Team Remodeling combines thoughtful planning, skilled craftsmanship, and organized communication for kitchens tailored to your home in Redmond.Explore kitchen remodeling
Table of Contents
Knobs vs. pulls: how the choice changes where you drill
Standard placement measurements: exact inch ranges to mark and drill
Sizing and proportion: apply the one-third rule with confidence
Placement by cabinet style: shaker, slab, inset, and tall panels
Tools and templates: using a jig for repeatable results
Accessibility and ergonomics: placing hardware for easier use
Common mistakes and how to avoid them
Design and finish coordination for a current look
Handling double doors and paired drawer fronts
Handling corner and angled cabinet doors
Visual balance beyond the tape measure
Why we treat hardware placement as part of the plan, not an afterthought
How Solution Team Remodeling handles hardware during a remodel
Selected useful manuals and trend reports
Sources
FAQ
Knobs vs. pulls: how the choice changes where you drill
A knob gives you a single grip point, so your fingers close around it from one direction. A pull gives you two mounting points and a bar to wrap your whole hand around, which spreads the load across the door or drawer front instead of concentrating it on one screw. That difference matters more than style preference once you start marking holes.
Knobs work well on smaller doors, narrow drawers, and traditional or shaker-style kitchens where a single decorative point looks intentional. Pulls make more sense on wide drawers, heavy pot drawers, and any front that gets opened with a loaded hand, since the two-point grip resists twisting and reduces strain on the mounting screws over years of use.
The choice also decides your layout logic:
A knob typically centers on the width of a small door or drawer front, with a single hole.
A pull runs horizontally on drawers and vertically on doors, needing two holes spaced to the hardware’s center-to-center measurement.
Mixed setups, knobs on upper cabinet doors and pulls on base drawers, are common and read as intentional when the finish stays consistent across the run.
A single hardware family (same finish, same silhouette) across an entire kitchen looks more finished than mixing shapes randomly from cabinet to cabinet.
If you want visual variety without looking scattered, pick one finish and one general shape language, then let knobs and pulls split by function rather than by whim.
Standard placement measurements: exact inch ranges to mark and drill
Cabinet doors typically take hardware 2 to 3 inches from the corner opposite the hinge, measured from both the closest edge and the top or bottom rail. Some guides cite a wider 1 to 4 inch range, and the extremes matter for specific cases: go closer to 1 inch on narrow cabinet doors where a full 3 inch offset would put the hardware too close to the panel’s center, and go toward 4 inches on tall pantry doors where a lower placement improves reach.
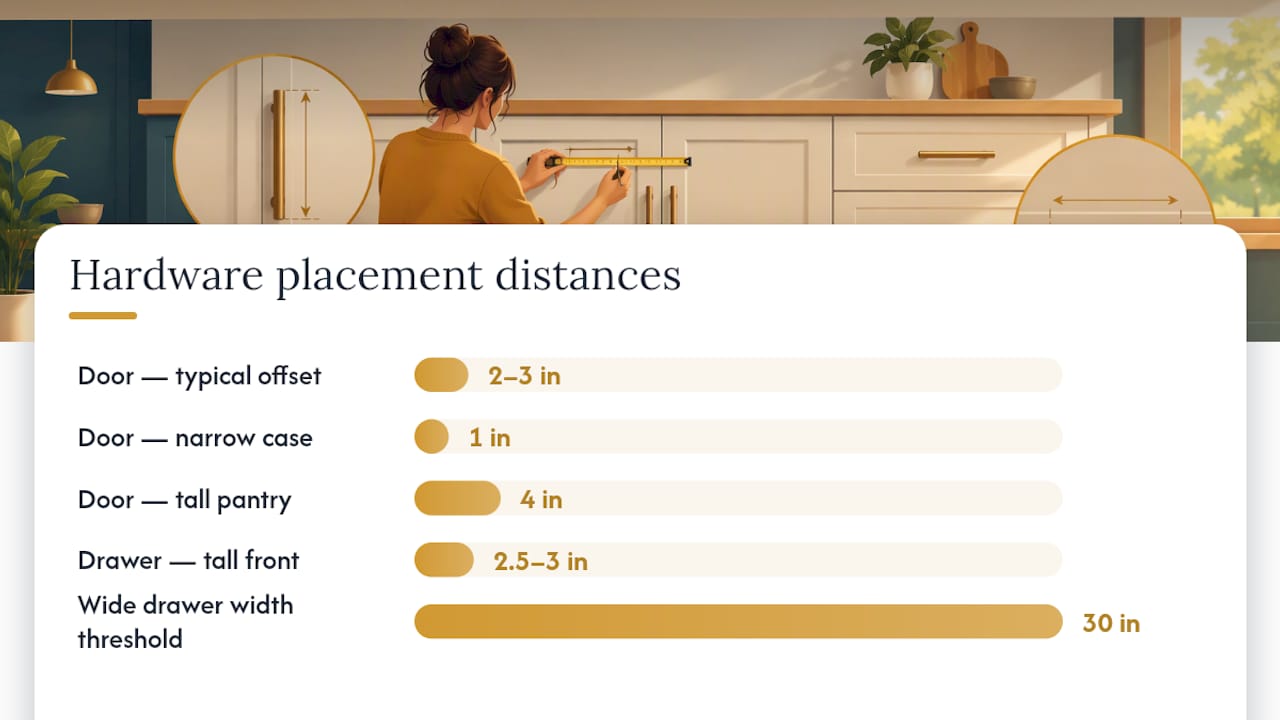
Drawers follow a different logic. Pulls usually sit centered vertically on the drawer front, or about 2.5 to 3 inches down from the top edge on taller drawer fronts. Wide drawers, generally 30-inch and up, often take two knobs or two shorter pulls spaced evenly rather than one oversized pull stretched across the whole front.
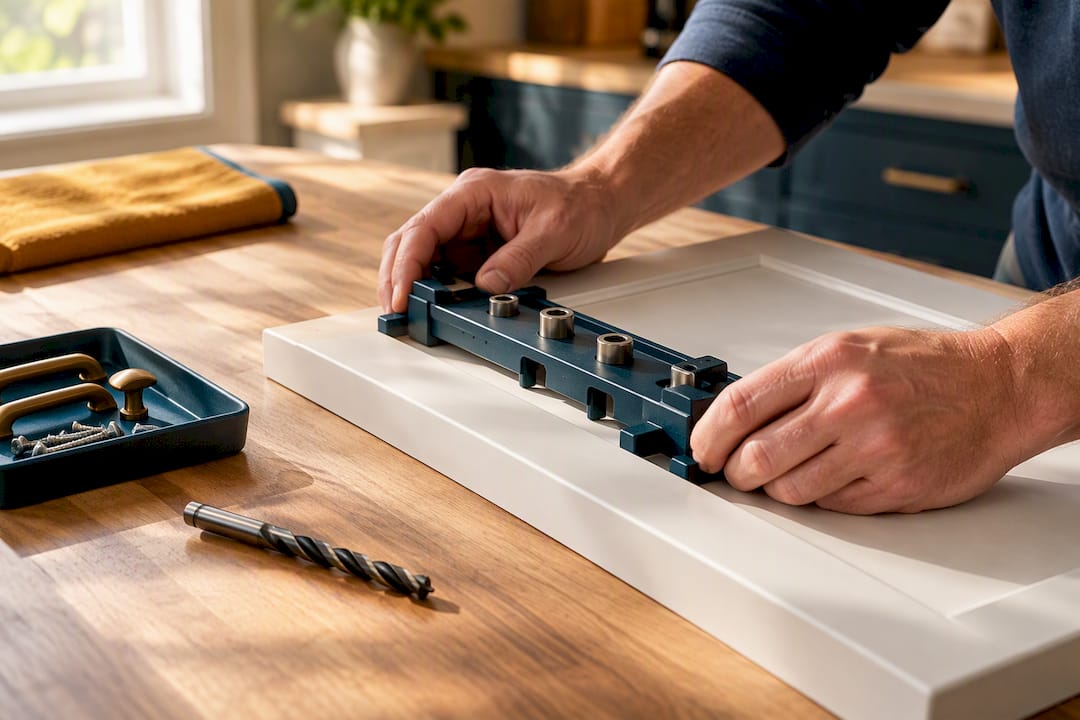
Most professional installers test the jig on a scrap piece before drilling a single cabinet door, confirming spacing with the actual hardware mounted through the drill bushings. That one extra step catches a miscalibrated jig before it turns into a dozen ruined doors.
Center-to-center (C-C) measurement is the distance between the two screw holes on a pull, and it is the number printed on the hardware packaging. Homeowners replacing existing pulls will most often encounter C-C sizes in the 3, 4, 5, and 6 inch range for standard drawers, with longer pulls running 8, 10, or 12 inches for wide fronts. Before you buy replacement hardware, measure your existing holes center to center rather than guessing from the pull’s overall length, since the decorative ends often extend past the actual mounting points.
A short checklist keeps a multi-door project from turning into a patchwork:
Measure every existing hole pattern before ordering hardware, since older cabinets sometimes mix C-C sizes.
Run a level across a full run of upper or base cabinets before drilling, not just one door at a time.
Mock up the position with painter’s tape or sticky putty and stand back from at least six feet before committing to the drill.
Sizing and proportion: apply the one-third rule with confidence
The one-third rule says a pull should run about one-third the width of the drawer front or one-third the height of a door panel, a proportion designers and hardware guides point to as the ratio that reads as balanced rather than undersized or oversized. Applied to common widths, that works out roughly like this:
An 18-inch drawer front suits a pull in the 5 to 6 inch range.
A 24-inch drawer front suits a pull around 8 inches.
A 30 inch drawer front suits a pull closer to 10 inches, sometimes with two pulls instead of one.
A 36 inch drawer front usually calls for two evenly spaced pulls rather than a single long bar, since a 12 inch pull on a 36 inch front starts to look thin relative to the space.
Keeping the same center-to-center spacing logic across a kitchen, even when pull lengths vary from drawer to drawer, creates a visual rhythm that reads as planned rather than assembled piecemeal. A row of cabinets with pulls at wildly different heights or offsets is the fastest way to make an otherwise well-built kitchen look unfinished.
Oversized pulls, in the 8 to 12 inch range or full-height vertical bars, earn their place on kitchen islands and tall pantry or appliance panels. Beyond looking substantial at a distance, a longer pull gives more surface area to grip when you are opening a loaded pot drawer or a heavy panel-front refrigerator door, which is as much an ergonomic call as a design one.
Pro Tip: When a drawer width falls between standard pull sizes, round down rather than up. A slightly shorter pull looks intentional; an oversized one looks like a mismatch waiting to be noticed.
Placement by cabinet style: shaker, slab, inset, and tall panels
The door style you own changes where hardware looks right, even when the base measurement rules stay the same.
Shaker doors have a recessed center panel that gives you a natural home for centered hardware, though some traditional kitchens offset the knob slightly toward the outer rail for a more classic look.
Slab or flat-front doors have no panel lines to guide the eye, so centered placement or a consistent edge offset both work, and minimalist kitchens often lean toward smaller, flush-mounted pulls to keep the surface quiet.
Inset doors sit inside the face frame rather than over it, which means tighter reveals around each door. Smaller knobs and shorter pulls respect that narrower margin, and placement usually needs to shift slightly inward from the standard offset to avoid crowding the frame.
Tall pantry and appliance panels benefit from vertical hardware, either a full-height pull that echoes the panel’s proportions or a single vertical pull positioned at a comfortable reach height rather than centered top to bottom.
None of these are rigid laws. They are starting points that account for how much visual “frame” each door style gives the hardware to sit inside, and adjusting from the standard 2 to 3 inch offset by half an inch in either direction rarely looks wrong once the door is hung.
Tools and templates: using a jig for repeatable results
Pro installers rely on jigs and drill guides for one reason: consistency across dozens of doors is nearly impossible to hold by hand and pencil alone. A cabinet hardware jig locks the spacing and the offset so every hole lands in the same spot relative to the door edge, run after run.
The basic workflow looks like this:
Test the jig setting on a piece of scrap the same thickness as your actual doors.
Set the spacing pins to match your hardware’s center-to-center measurement.
Tighten the stops against the door edge so the jig can’t shift mid-drill.
Mount a sample piece of hardware through the bushings to confirm the hole spacing before touching a real cabinet.
Drill through the guide bushings, which keep the bit straight and prevent the wandering that ruins a finished door face.
Long pulls, anything past 8 inches, usually need the jig’s extension arms or a rapid-center adjustment to reach the wider spacing without recalibrating the whole tool for each size.
A few drill basics matter as much as the jig itself. Use a bit sized to the screw, not the hole you eyeball. Drill a pilot hole first on hardwoods to avoid splitting the grain. Put a strip of masking tape over the exit point on the back of the door to reduce tear-out. And match screw length to the door thickness plus enough thread engagement to hold the hardware tight, since a screw that is even a quarter inch too long will poke through a thin door front.
Pro Tip: Buy or borrow one extra set of screws in a slightly longer length than the hardware ships with. Doors vary in thickness by a few millimeters between manufacturers, and a mismatched screw is a common last-minute holdup.
Accessibility and ergonomics: placing hardware for easier use
Hardware that works for every hand in the house, not just the strongest grip, comes down to a few placement and shape decisions. Accessibility guidance generally recommends hardware that can be operated with an open palm rather than a tight pinch, which is why D-shaped pulls tend to outperform small round knobs for anyone with limited grip strength or wrist mobility.
Favor a D-pull or bar pull over a small knob wherever daily, repeated use is expected, like the main pot drawer or the pantry door.
On tall upper cabinets, consider lowering the standard placement slightly so the hardware sits within easier reach from a seated or shorter standing height.
On base cabinets meant for someone with limited mobility, a slightly higher placement than standard can reduce bending.
Before finalizing any layout, open a fully loaded drawer with one hand and see whether the pull holds up under that motion without straining your wrist.
For a kitchen built specifically around accessibility needs, ADA and UFAS guidelines cover clearance and reach requirements in more depth than general homeowner placement rules do, and that formal guidance is worth consulting directly for specialized cases.
Common mistakes and how to avoid them
Most hardware problems trace back to skipping a step that felt unnecessary at the time. Inconsistent heights from door to door are the most visible mistake, usually caused by measuring each door independently instead of working off one marked template. Wrong pull projection, meaning the hardware sticks out further than the clearance between two adjacent doors allows, causes knuckle-scraping clashes that only show up once cabinets are actually in use. Undersized pulls on wide drawers look thin and cheap regardless of how good the finish is. Mixing finishes without deciding on a plan first often results in a kitchen that looks like it was assembled from three different hardware orders, because it was.
On the installation side, drilling freehand without a jig is the single biggest source of crooked, mismatched holes. Wrong screw length either strips the mounting or pokes through the door face. Skipping the scrap test means the first mistake happens on a real door instead of a spare piece of wood.
Measure twice and mark with tape before the drill ever touches the door.
Use a jig for anything beyond a single cabinet, even if it feels slower at first.
Order physical samples of your chosen hardware and view them under your kitchen’s actual lighting before ordering the full count.
Document how many pulls, knobs, and screws you need before starting, so a mid-project trip to the hardware store doesn’t stall the whole job.
Pro Tip: Keep one extra knob or pull in the box after installation. It is the cheapest insurance against a stripped screw hole six months down the road.
Design and finish coordination for a current look
A kitchen holds together visually when it limits itself to two hardware finishes: one primary finish used throughout, and one accent finish reserved for an island, a pantry wall, or a single standout run. Trend coverage for 2026 points toward warmer metals, bronze and aged brass in particular, along with deliberately curated mixed-metal pairings rather than a single cold, uniform finish across every surface.
Treat hardware as a design decision made early, alongside cabinet color and countertop material, not as an afterthought picked the week before installation.
Build two finish packages, a primary and an accent, and resist adding a third.
Hardware scale and tactile feel are getting more attention than in past years, according to current trend reporting, meaning heavier, more substantial-feeling pulls are replacing thin, lightweight hardware even in mid-range kitchens.
Order finish samples and view them in your own kitchen’s lighting, since warm bronze under warm bulbs reads very differently than the same finish under daylight LEDs.
Handling double doors and paired drawer fronts
Double doors, the kind that meet in the middle over a single cabinet opening, need hardware placed symmetrically on the outer edge of each door rather than centered on each individual panel. Both knobs or pulls should sit the same distance from the outer edge of their respective doors, mirroring each other across the gap where the doors meet. This keeps the pair looking like one balanced unit instead of two mismatched halves.
Paired drawer fronts, common on kitchen islands with a false double-drawer look or on wide banks split into two equal fronts, follow the same mirroring logic. Measure from the outer edge of each drawer front inward, using identical offsets on both sides, rather than centering each pull independently on its own panel. If the drawers are actually one wide drawer behind a two-panel face, both pulls should still land at the same height and the same distance from the outer edges to preserve the illusion of symmetry.
The one exception worth planning for is a narrow gap between the two doors or fronts. When that gap is tight, pull the hardware slightly further from the center seam than the standard offset calls for, so the two pieces of hardware don’t visually crowd each other across the divide.
Handling corner and angled cabinet doors
Corner cabinets, whether they use a lazy Susan, a blind corner pullout, or an angled door front, break the standard corner-offset rule because there is no single “corner opposite the hinge” in the usual sense. On an angled corner door, place the hardware on the edge farthest from the hinge side, using the same 2 to 3 inch offset from that outer edge as you would on a standard door.
For diagonal or bi-fold corner doors that open in two connected panels, treat each panel individually using the standard placement logic, but check that neither piece of hardware collides with the other panel when both doors swing open. A quick way to catch this before drilling is to open the cabinet fully with a piece of tape marking your intended hole position and watch what happens through a full swing.
Irregularly shaped doors, tapered upper cabinets that follow a sloped ceiling or angled end panels on an island, don’t follow a fixed formula. The safest approach is to keep the hardware at a consistent height relative to the rest of the run, even if that means adjusting the horizontal offset on the odd-shaped piece to make it look intentional rather than mathematically perfect.
Visual balance beyond the tape measure
Measurements get hardware functionally correct, but visual balance is what makes a kitchen look designed rather than assembled from a spec sheet. Aligning hardware with a shaker door’s inner panel lines, rather than the outer door edge, often reads as more deliberate, especially on wider stiles where the two reference points sit noticeably apart.
On cabinets with a face frame, hardware that lines up with the rail (the horizontal frame piece) rather than floating independently against the door creates a cleaner sightline when you view the kitchen from across the room. This matters most on runs where the eye naturally scans horizontally, like a long bank of base cabinets under a countertop.
Stepping back from the individual door to the full run is the real test. Consistent height across every door, even when each door’s proportions vary slightly, matters more to how a kitchen photographs and reads at a glance than any single door being technically perfect on its own. A hardware layout that is correct door by door but inconsistent room by room will still look off, and that inconsistency is almost always more noticeable than a half-inch deviation from the standard offset on any one panel.
Why we treat hardware placement as part of the plan, not an afterthought
Hardware gets specified early on our remodeling projects rather than left for the final walk-through, because a mismatched or crooked pull is one of the most visible things a homeowner notices after move-in. We document hardware counts and finish choices as part of the planning process on kitchen and bathroom projects, the same way we track flooring square footage or trim linear feet.
Most homeowners can handle straightforward knob and pull swaps on standard cabinet doors with a basic jig and some patience. Where it makes sense to bring in a professional is appliance-panel hardware, which often involves thicker custom panels and tighter tolerances, or a full re-drilling job across an entire kitchen where dozens of doors need to land within a fraction of an inch of each other. Our door installation and millwork work in the Redmond, WA area regularly includes exactly this kind of detail work alongside larger remodels.
— Vlad
How Solution Team Remodeling handles hardware during a remodel
If you would rather hand off the measuring, sourcing, and drilling entirely, that is where a full kitchen or bathroom remodel through Solution Team Remodeling saves the most time. We handle hardware selection and placement as part of the broader project, alongside cabinet installation, trim, and finish work, rather than treating it as a separate afterthought once the cabinets are already hung.

A typical estimate for cabinet-related work includes an on-site measure, a sample mounting of the hardware you’re considering so you can see it in your own kitchen’s lighting, a documented hardware count, and an installation plan that covers timing alongside any other work on the project. We serve homeowners in Redmond, WA and the surrounding area, with the same transparent pricing and scheduling on a hardware-focused project as on a full remodel. Take a look at our full range of services or schedule an estimate to talk through what your kitchen or bathroom needs.
Selected useful manuals and trend reports
A few sources are worth keeping on hand if you’re planning a multi-door hardware project. The cabinet hardware jig instruction manual walks through the full installation workflow, including spacing pins and drill bushings, in more detail than fits in any single article. The 2026 hardware trends overview covers finish direction and scale in more depth for anyone planning a full kitchen refresh. And the knob and pull selection guide is a useful reference for sizing decisions once you know your drawer widths.
Sources
FAQ
What is the one-third rule for cabinet hardware?
The one-third rule says a pull should run about one-third the width of the drawer front or one-third the height of a door panel, which hardware selection guides point to as the proportion that looks balanced rather than undersized. It’s a starting ratio, not a strict formula, so rounding down slightly on odd widths usually looks better than rounding up.
What is the standard placement for cabinet hardware?
Cabinet doors typically take hardware 2 to 3 inches from the corner opposite the hinge, with some guides citing a wider 1 to 4 inch range for edge cases. Drawer pulls usually center vertically on the drawer front, or sit about 2.5 to 3 inches down from the top edge on taller fronts.
What are the trends for cabinet pulls in 2026?
Trend reporting for 2026 points toward warmer metals like bronze and aged brass, along with deliberately curated mixed-metal pairings instead of a single uniform finish. Limiting a kitchen to two coordinated finishes, a primary and an accent, remains the practical way to apply that trend without creating visual clutter.
What are the basic rules for choosing between pulls and knobs?
Knobs suit smaller doors and narrow drawers where a single grip point looks proportionate, while pulls suit wide drawers and heavy-use fronts where a two-point grip spreads the load and resists twisting. Many kitchens mix both intentionally, using knobs on upper doors and pulls on base drawers, as long as the finish stays consistent across the run.
Do I need a jig to install cabinet hardware correctly?
A jig isn’t required for a single door, but it becomes valuable fast once you’re drilling more than a few doors or drawers, since it locks the offset and center-to-center spacing so every hole matches. Installation instructions for cabinet hardware jigs recommend testing the setting on scrap material first to confirm spacing before drilling any real cabinet door.
Recommended
Back to Blog
