deck-railing-options
Deck Railing Options: 2026 Costs, Code Rules, and DIY Limits
Composite, aluminum, and cable systems cover most homeowners’ needs, with wood and cedar as the budget entry points and glass as the premium view-preserving choice. The real decision usually comes down to three things: how much upkeep you want, whether you need to keep sightlines open, and your budget per linear foot. Measure your deck, check your local guard-height rule, and decide early whether this is a weekend DIY job or a quote-worthy project for a pro.
TL;DR:
Measure after decking is installed: model rules trigger guards above 30 inches and generally require 36 inches of height, while some localities require 42.
Mid 2026 material prices ranged from about $22 per linear foot for pressure treated systems to $145 for glass; basic installation averaged about $45.
Wood, composite, and aluminum kits suit DIY installation, often taking a weekend or two for 50 feet; glass, cable, and welded steel usually require professionals.
Itemized quotes should separate level footage, stairs, and corners, which raise labor costs, and clarify whether permits and engineering are included.
Keep baluster and stair gaps small enough to block a four inch sphere; stair rail openings allow up to four and three eighths inches.
SolutionteamremodelingPlan Your Redmond Home RemodelSolution Team Remodeling brings thoughtful planning and skilled craftsmanship to kitchen, bathroom, and whole-home projects in Redmond, WA.Explore remodeling services
Table of Contents
1. Compare materials by look, upkeep, and lifespan
2. What code rules decide your railing design
3. What installed railing costs and lifespans look like
4. Decide if your railing is a DIY job or a pro job
5. A step-by-step process to choose your railing
6. How weather affects railing durability in wet, mild climates
7. Local building code nuances that affect your railing plan
8. How long railing installation takes from selection to finish
9. What else drives your total railing project cost
How a remodeling pro approaches railing decisions
Get a clear quote on your deck railing
FAQ
Sources
1. Compare materials by look, upkeep, and lifespan
Every deck railing option trades off appearance, maintenance, and cost differently, and knowing where each material lands helps narrow the field fast.
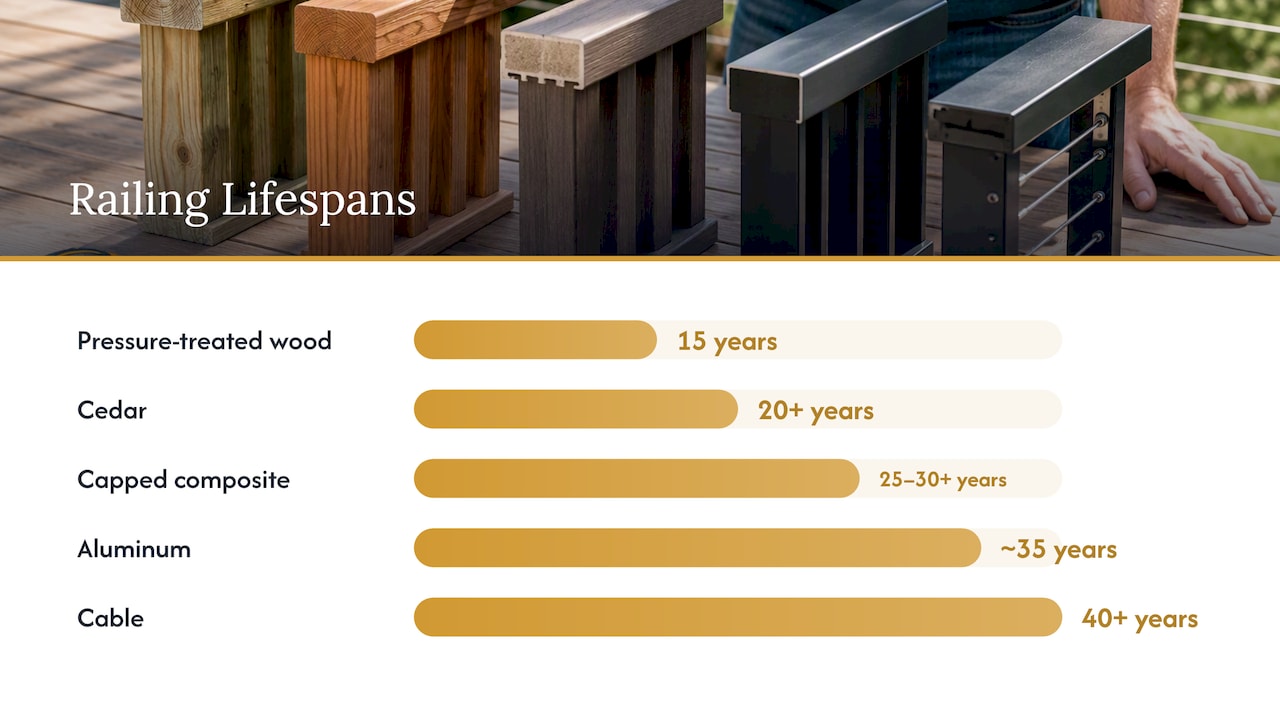
Pressure-treated wood is the default for a reason: it’s cheap, familiar, and every lumberyard stocks it. It needs staining or sealing every two to three years to fight graying and splintering, and typically lasts around 15 years before posts or rails need replacing.
Cedar looks warmer and resists rot better than pressure-treated pine thanks to natural oils, but it still needs periodic staining to hold its color. Well-maintained cedar railing can last 20 years or more.
Capped composite (Trex, TimberTech, and similar lines) skips staining entirely. A quick wash with soap and water keeps it looking new, and composite railing commonly lasts 25 to 30 years or longer, making it the low-maintenance favorite for homeowners who want wood-like warmth without the upkeep.
PVC behaves similarly to composite: it’s low-maintenance and holds paint-level consistency without re-staining, though it can look more plastic-like up close than capped composite.
Aluminum offers slim, modern sightlines and resists corrosion well. It’s one of the longer-lived options, often rated near 35 years, and requires almost no maintenance beyond the occasional rinse.
Steel (welded or powder-coated) delivers a heavier, more architectural look and strong durability, but it’s usually a specialty fabrication job rather than a stock kit.
Cable railing keeps views nearly unobstructed and suits modern or view-focused decks. The stainless steel cable and hardware can last 40 years or more, though cables need periodic re-tensioning.
Tempered glass preserves views best of all and gives a clean, high-end look, but cable and glass systems tend to be the most expensive and often need specialty installation with heavier end posts to handle the loads.
For a 50-linear-foot run, DIY-friendly kits (composite, aluminum, basic wood) typically take a weekend or two for a reasonably handy homeowner, while cable and glass systems often run longer because of precise post spacing and tensioning work.
Wood and cedar: lowest upfront cost, highest upkeep, shortest lifespan.
Composite, PVC, and aluminum: moderate cost, minimal upkeep, 25+ year lifespan.
Cable and glass: highest cost, best view preservation, longest hardware lifespan.
Mixing materials is a practical way to balance budget and style: wood or composite posts with metal balusters, or a composite top rail paired with glass infill panels, can deliver a custom look without paying premium rates across the entire railing run.
2. What code rules decide your railing design
A few code triggers shape nearly every railing decision before style even enters the picture.
Under the model code guard-height provisions, a guard is required once the walking surface sits more than 30 inches above grade, and that measurement is taken to the actual walking surface, not the framing, so it’s best measured after decking boards go down. Where required, residential guards must be at least 36 inches tall, with stair guards measured at 34 inches minimum, and openings must prevent a 4-inch sphere from passing through (4 3/8 inches on stair rails). Triangular gaps formed where a stair rail meets the treads face the same sphere test.
Some local jurisdictions require 42-inch guards instead of the 36-inch minimum, so check with your local building department or your contractor before finalizing a design.
Cable systems add their own wrinkle: tight cable spacing combined with the cumulative tension of a long run often means standard 4x4 wood posts aren’t stiff enough, pushing the design toward steel-reinforced sleeves or dedicated metal posts.
3. What installed railing costs and lifespans look like
Material choice drives most of the price swing between railing systems, and the gap is wide. As an illustrative mid-2026 snapshot, material costs alone range from roughly $22 per linear foot for pressure-treated wood up to $145 per linear foot for tempered glass, with cedar around $30, capped composite around $65, aluminum around $78, steel around $95, and cable around $110. Installed totals run higher once labor, fabrication, and regional rates are added, and pressure-treated wood often lands around $45 per linear foot installed.
Statistic callout: Installed costs for an 8-system comparison show roughly a 3x spread between pressure-treated wood and tempered glass railing, meaning a 50-linear-foot run can cost thousands more or less depending purely on material choice.
Corners and stairs add their own premiums. A corner post typically needs extra bracing and trim work, and a stair run requires angled balusters or custom-fabricated panels, both of which push labor time up compared to a straight, level run. On a 50-linear-foot estimate, a few corners and one stair section can meaningfully shift the total even before material cost is factored in.
Lifespan changes the math over time. Pressure-treated wood costs less today but needs recurring staining and earlier replacement, while composite costs more upfront and essentially eliminates the recurring maintenance bill for decades.
4. Decide if your railing is a DIY job or a pro job
Site-built pressure-treated wood, cedar, and most boxed composite or aluminum kits are realistic DIY projects for a homeowner comfortable with a drill, a level, and basic math. Expect a full weekend or two for a 50-linear-foot run, more if the layout includes corners or stairs.
Glass panels, cable railing, and welded steel usually call for a professional. Glass needs precise post tolerances to avoid cracked panels, cable needs calculated tensioning and stiff end posts, and steel typically requires shop fabrication and welding that aren’t practical in a driveway.
DIY-friendly: pressure-treated wood, cedar, boxed composite kits, aluminum kits.
Pro-recommended: tempered glass, cable systems, welded or custom steel.
If you do go the DIY route, through-bolt posts rather than relying on screws alone, lay out balusters with math rather than by eye to guarantee the sphere test passes, and always measure guard height after the decking boards are installed.
Pro Tip: When comparing quotes, ask each contractor to itemize level railing footage separately from stair footage and corner count, since that’s where bids tend to diverge the most.
5. A step-by-step process to choose your railing
Work through the decision in order rather than jumping straight to material samples.
Measure your deck’s actual railing footage after the decking is installed, separating level runs from stairs.
Decide whether view preservation or privacy matters more for your layout.
Set a budget band per linear foot before falling in love with a look.
Narrow your choice to two favored systems to compare realistically.
Ask each contractor for itemized level linear footage, stair linear footage, corner count, and warranty terms.
Request photos of similar completed installs and a written maintenance schedule alongside the quote.
Confirm post attachment method and stair handrail details with any contractor, and ask whether engineered or stamped plans are needed for cable or glass systems before signing anything.
6. How weather affects railing durability in wet, mild climates
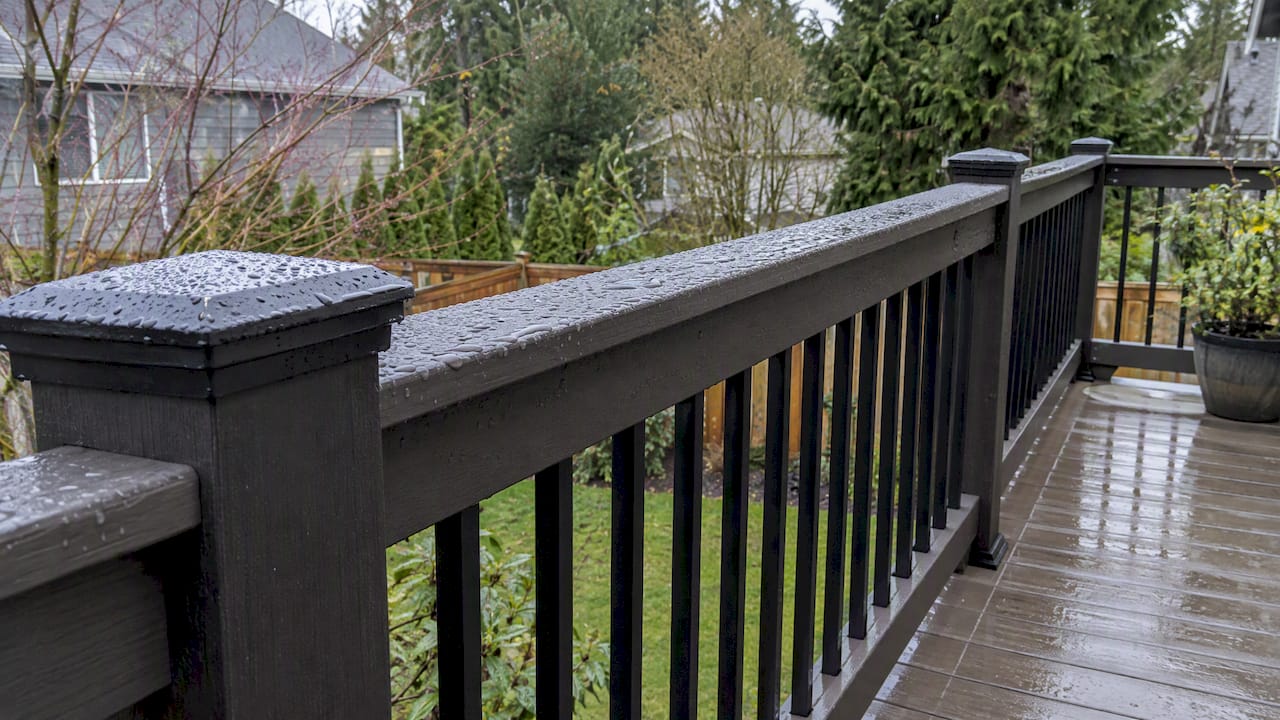
Marine-influenced climates with frequent rain and moderate temperature swings put different stress on each material. Wood and cedar are the most exposed to moisture cycling: without regular sealing, trapped moisture leads to graying, cupping, and eventually rot at post bases where water pools. Composite and PVC shrug off repeated wet-dry cycles without staining, which is a major reason they’ve become the low-maintenance default in consistently damp regions.
Metal systems respond differently. Aluminum’s factory finish resists corrosion well in persistent moisture, while uncoated or poorly coated steel is more vulnerable to rust streaking over time if the powder coat gets scratched. Cable hardware is stainless steel specifically because exposed fasteners face the most direct, repeated moisture contact.
Glass holds up structurally in wet weather but shows water spots and mineral deposits more visibly than other materials, so it needs more frequent cleaning to stay looking sharp.
For a deck that sees a lot of rain and relatively little harsh UV, the practical takeaway is that composite, aluminum, and cable hardware hold their finish longest with the least intervention, while wood’s lifespan estimates assume you keep up with the staining schedule. Skipping maintenance in a wet climate shortens a wood railing’s usable life faster than it would in a drier region.
7. Local building code nuances that affect your railing plan
Washington State follows the International Residential Code with local amendments, and individual jurisdictions can adopt stricter requirements than the baseline 36-inch guard height, so it’s worth confirming the exact rule with your local building department before finalizing a design, since some municipalities require taller guards or additional engineering documentation for specific railing types.
Permit requirements often hinge on deck height and railing type rather than railing material alone: a deck more than 30 inches above grade generally triggers both the guard requirement and, in many jurisdictions, a permit review for the overall deck structure. Cable and glass systems are more likely to require engineered or stamped plans locally because of the loads and post requirements involved, which can add review time compared to a standard wood or composite railing.
If your project also touches ledger attachment, rim joist reinforcement, or stair stringer work, that structural scope typically falls under the same permit as the railing itself, so it’s worth asking your contractor whether railing and deck framing are permitted together or separately in your jurisdiction. Getting this sequencing right upfront avoids delays once materials are ordered.
8. How long railing installation takes from selection to finish
Once you’ve picked a material, the timeline from decision to a finished railing typically moves through a few predictable stages. Ordering lead time varies the most: stock composite or aluminum kits may ship within a week or two, while custom glass panels or fabricated steel railing can take several weeks for measurement, fabrication, and delivery.
Installation itself is usually the shortest part of the timeline. A straightforward level run of composite or aluminum railing on an existing deck can often be installed in a day or two, while a run with multiple corners, a stair section, or cable tensioning can stretch installation to several days.
Permit review, when required, adds time before work can start at all, particularly for cable or glass systems that may need engineered documentation. Homeowners planning around a specific date, like a summer gathering, should build in extra weeks for ordering and permitting on top of the installation days themselves, rather than assuming installation start date equals order date.
9. What else drives your total railing project cost
Material and linear footage set the baseline, but several other factors shift the final number up or down. Labor complexity is the biggest swing factor beyond materials: a railing with multiple corners, a stair section, or an irregular deck shape takes measurably longer to install than a straight run, and that labor time shows up directly in the bid.
Permits and any required engineering add a line item that’s easy to overlook when comparing material costs alone. Cable and glass systems, as noted earlier, are more likely to need stamped plans, which adds both time and fee costs to the project.
Customization options, custom post caps, color-matched top rails, non-standard baluster spacing, or mixed-material designs, all add cost on top of the base material and labor rate. Access and site conditions matter too: a second-story deck or a tight side-yard access point can slow material staging and increase labor hours compared to a simple ground-level run.
Finally, removal and disposal of an old railing, if you’re replacing rather than building new, is often priced separately and worth confirming is included in any quote you receive.
How a remodeling pro approaches railing decisions
We walk homeowners through material guidance, code checks, and realistic scheduling before a single post goes in, pairing that planning with licensed, insured crews for the installation itself. We typically steer clients toward professional installation for tempered glass, cable systems needing engineered posts, multi-run stairs, and any project requiring ledger or rim joist reinforcement, since those scopes carry more engineering and tolerance risk than a standard wood or composite run.
— Vlad
Get a clear quote on your deck railing
We provide deck railing installation with transparent, itemized quotes, licensed crews, and honest material guidance, so you know what you’re paying for before work starts like our drywall installation in Virginia Beach, VA: Expert craftsmanship for your walls.

If you’re ready to compare materials against your own deck’s measurements, reach out for a site visit through our deck building services page and we’ll walk the project with you from first measurement to finished railing.
FAQ
What is the cheapest way to do deck railing?
Pressure-treated wood is the lowest-cost railing option, with material costs around $22 per linear foot before installation. Building it yourself on a straightforward, level run keeps costs down further, since labor is typically the biggest add-on beyond material price.
What is the 4 ball rule for railings?
The 4 ball rule, more precisely the 4-inch sphere rule, means no gap in a guard can be wide enough for a 4-inch sphere to pass through, tightening to 4 3/8 inches on stair rails. It’s designed to keep small children from slipping through railing openings, and it applies to baluster spacing as well as any triangular gaps at stair rail intersections.
What is the least expensive deck railing?
Pressure-treated wood remains the least expensive system both in raw material cost and typical installed price, running around $45 per linear foot installed in representative mid-2026 pricing. Cedar comes in slightly higher but still well below composite, metal, cable, or glass options.
What is the best material for deck railing?
There’s no single best material: composite and PVC suit homeowners who want minimal upkeep, aluminum suits those who want a slim modern profile with long life, and cable or glass suit anyone prioritizing unobstructed views. The right choice depends on your budget, how much maintenance you’re willing to do, and whether preserving sightlines matters for your deck’s setting.
Sources
Recommended
Back to Blog
