kitchen-lighting-plan
Kitchen Lighting Plan for Remodels: 30–100 Footcandles and NEC Rules
The best kitchen lighting plan uses three layers, ambient, task, and accent, each on its own switch or dimmer, sized to specific footcandle targets: ambient at 30 to 40 footcandles, task at 50 to 100 footcandles, and accent at 10 to 20 footcandles. Task lighting over counters and the stove comes first because that is where you need the most usable light. After the layout is set, a licensed electrician should confirm circuit capacity and code compliance before anything gets wired in.
TL;DR:
Task lighting over counters should provide at least 50 to 100 footcandles, with fixtures placed at the front third of cabinets and behind diffusers to reduce hotspots.
Recessed ambient lighting requires about six fixtures delivering 1,000 lumens each in a 200-square-foot kitchen with 30 to 40 footcandles, spaced evenly for uniform coverage.
Under-cabinet wiring should be planned early during remodel as separate circuits with dimmers, with fixture costs typically ranging from 300 to 800 dollars per system.
Mixing color temperatures without a plan diminishes the aesthetic impact, with warm tones (2700K to 3000K) for ambient and pendants, and cooler (3000K to 3500K) for task lighting.
Coordinating lighting layout with cabinetry and electrical work before installation prevents costly change orders and ensures code compliance.
SolutionteamremodelingPlan Your Kitchen Remodel With ConfidenceSolution Team Remodeling brings thoughtful planning, skilled craftsmanship, and organized communication to kitchen remodels in Redmond, WA.Explore kitchen remodeling
Table of Contents
1. Understand the three-layer lighting strategy and its targets
2. Choose and place task lighting for counters and prep zones
3. Set ambient lighting with recessed fixtures and lumen math
4. Place pendants and accent lighting for depth and warmth
5. Know the wiring and code rules before you finalize the plan
6. Pick dimmers, color rendering, and smart controls that actually work
7. Avoid the mistakes that show up on inspection day
8. Budget realistically and know who to hire for the job
9. Why a coordinated lighting plan saves money later
Get a lighting plan built into your kitchen remodel
Where these lighting recommendations come from
Sources
FAQ
1. Understand the three-layer lighting strategy and its targets
Ambient lighting fills the room so you can move around safely and see the space as a whole. Task lighting lights the surfaces where work happens: counters, the stove, the sink, and the island. Accent lighting adds depth and highlights features like open shelving, art, or a backsplash, without doing any of the heavy lifting.
Each layer has a numeric target based on residential lighting guidance from USAI Lighting:
Ambient: 30 to 40 footcandles, spread evenly across the room.
Task: 50 to 100 footcandles, concentrated directly on work surfaces.
Accent: 10 to 20 footcandles, low and atmospheric.
To turn footcandles into a fixture plan, you need to know how much light a fixture actually throws onto a surface, since footcandles measure light landing on a plane, not raw output. A rough working method: multiply your target footcandle level by the square footage of the area, then divide by the estimated efficiency of the fixture and its distance from the surface to get a lumen budget you can shop against. This is why a kitchen lighting layout should start with target footcandles first and fixture selection second, not the other way around.
Separate switching matters here because the three layers serve different moods and tasks. Cooking at 7 AM calls for full task and ambient light, while a dinner with guests might run on ambient and accent alone, dimmed low. Wiring each layer to its own switch or dimmer is what makes that flexibility possible, and it is far cheaper to plan during a remodel than to retrofit later.
2. Choose and place task lighting for counters and prep zones
Task lighting is the layer that determines whether your kitchen actually functions well, and under-cabinet fixtures do most of that work.
LED tape or strip lighting delivers even, continuous illumination and outputs roughly 200 to 800 lumens per foot depending on density, but it runs on low voltage and needs a driver.
Linear LED bars are direct-wire 120-volt fixtures that simplify installation and put out 300 to 1,000 lumens each, a solid middle ground for most kitchens.
Puck lights work for accenting small zones or glass-front cabinets but produce only 100 to 300 lumens each, so they are weaker for continuous task coverage.
Mount fixtures at the front third of the cabinet underside, tucked behind a valance, so light falls on the counter rather than bouncing off the backsplash into your eyes. A frosted diffuser channel smooths out hotspots from individual LEDs, which matters more with tape lighting than with bars.
Hardwired systems need a place to hide the driver, usually inside the cabinet or in a nearby soffit, and should run on their own switch leg separate from receptacle circuits. Ampora Labs notes that hardwiring during a remodel gives a cleaner look and more reliable long-term performance than plug-in strips, since there is no visible cord or wall-wart transformer to work around.
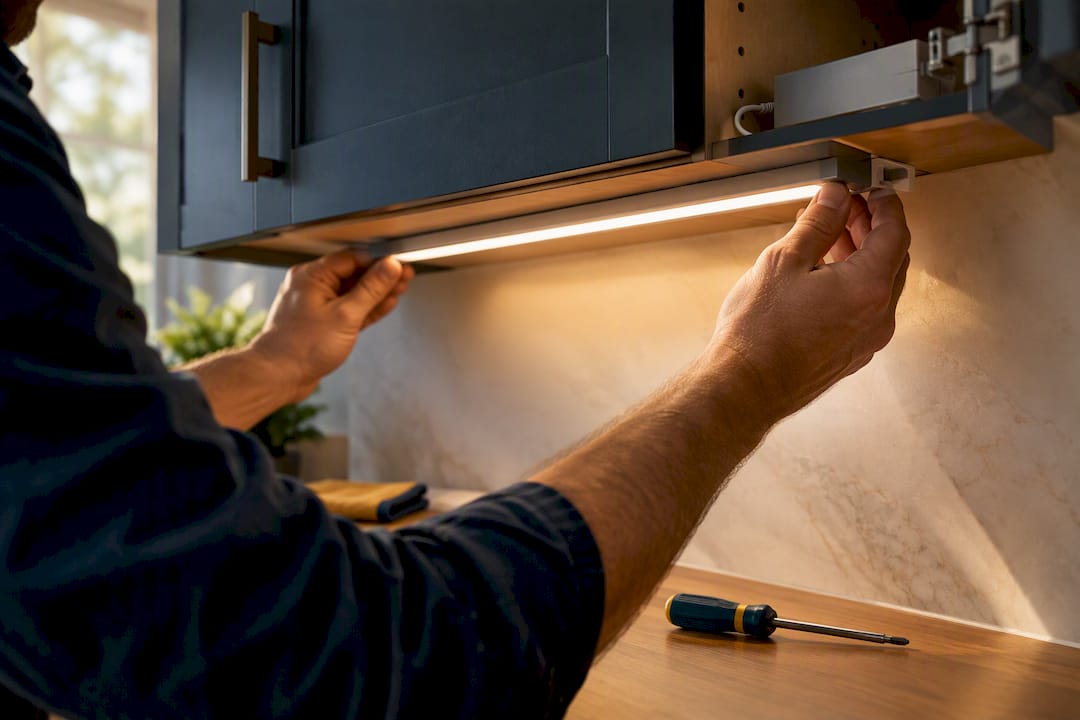
Pro Tip: If your cabinets are staying put during a remodel, get the electrician to rough in the switch leg for under-cabinet lighting before drywall goes up. It is far cheaper than fishing wire through finished walls later.
Installed costs for under-cabinet systems typically run $300 to $800 depending on cabinet run length and whether the job is new construction or a retrofit behind existing cabinets.
3. Set ambient lighting with recessed fixtures and lumen math
Ambient light is the baseline that keeps the whole kitchen visible and safe to move through. Recessed LED cans are the most common choice because they sit flush with the ceiling and spread light broadly without competing with cabinetry or sightlines.
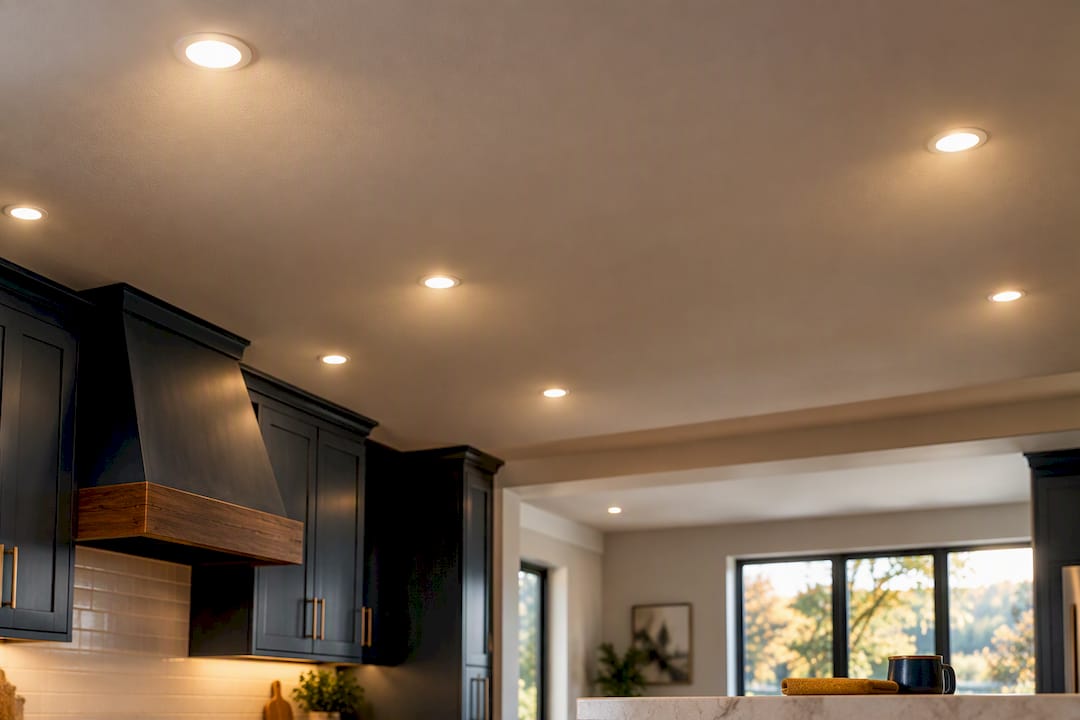
A simple spacing rule: divide the ceiling height by two to get a rough spacing distance between fixtures, then adjust for room shape so light overlaps evenly rather than leaving dark corners near cabinets or the sink.
To translate the 30 to 40 footcandle ambient target into a fixture count, work backward from your kitchen’s square footage. A 200 square foot kitchen aiming for the low end of that range needs roughly 6,000 lumens of ambient light delivered to the floor plane, once you account for fixture losses and beam spread. Split across six recessed cans, that works out to about 1,000 lumens each, in line with common 4 inch and 6 inch LED retrofit output.
Standard 4 inch to 6 inch recessed LEDs cover ambient lighting well in most kitchens under 10 foot ceilings.
Flush or semi-flush ceiling fixtures suit lower ceilings or spaces where a decorative element adds character.
Taller ceilings, above 9 feet, often benefit from a mix of recessed cans and a statement flush fixture rather than recessed lighting alone.
Every ambient circuit should run on a dimmer so the layer can drop to a soft glow when task and accent lighting take over.
4. Place pendants and accent lighting for depth and warmth
Pendants over an island or peninsula are both a task and a style choice, and getting the spacing wrong is one of the most visible mistakes in a kitchen. According to design guidance from NP Line Design, pendants should hang 24 to 30 inches apart and sit 30 to 36 inches above the countertop, low enough to feel intentional but high enough to avoid blocking sightlines across the island. Groups of two or three pendants generally read better than a single oversized fixture over anything longer than a 6 foot island.
Beyond pendants, several accent treatments add dimension without stepping on task lighting:
Toe-kick lighting along the base of cabinets creates a soft glow at night, useful as a low-level path light.
In-cabinet lighting inside glass-front uppers highlights dishware or glassware and adds visual layering to open shelving.
Valance or cove lighting above upper cabinets bounces light off the ceiling for a soft wash, and pairs well with architectural trim or coving profiles, including LED-ready coving options designed to hide the fixture entirely.
Color temperature ties the whole plan together. Ambient and pendant fixtures generally look best at 2700K to 3000K, a warm, residential tone, while task lighting can run slightly cooler at 3000K to 3500K for better clarity on cutting boards and stovetops. Mixing temperatures across layers without a plan is one of the fastest ways to make a kitchen feel off, even when the fixtures themselves are good quality.
5. Know the wiring and code rules before you finalize the plan
Lighting design only works if the wiring behind it is done correctly, and kitchens carry some of the strictest electrical code requirements in a home. NEC 210.11©(1) requires at least two dedicated 20-amp small-appliance branch circuits for countertop receptacles, and lighting should never be tapped onto those circuits. Kitchen receptacle circuits need GFCI protection under 210.8(A)(6), and branch circuits require AFCI protection under 210.12(B).
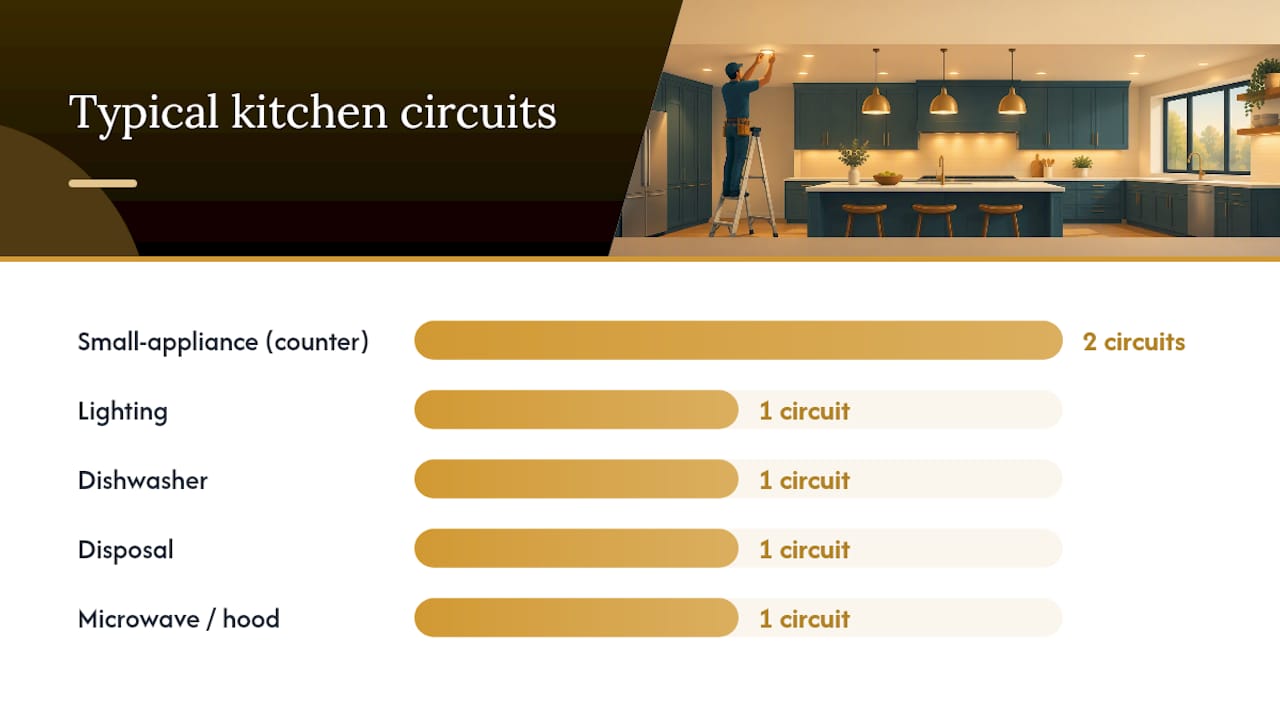
A newly wired kitchen typically needs at least two dedicated 20-amp small-appliance circuits just for countertop receptacles, separate from lighting, disposal, dishwasher, and microwave circuits, which is why panel capacity is worth checking early in any kitchen remodel.
A typical new-construction kitchen ends up with separate circuits for small appliances, lighting, the dishwasher, the disposal, and often the microwave or range hood, and older homes frequently need a panel upgrade to support that load safely. Bring a short checklist to your electrician walkthrough:
Confirm the number of dedicated circuits available versus what the lighting and appliance plan requires.
Ask where GFCI and AFCI protection applies on your specific circuit layout.
Verify dimmer compatibility with the exact LED fixtures or drivers you plan to install.
Confirm where low-voltage drivers for under-cabinet lighting will be located and how they get switched.
None of this is optional detail. It is the difference between a lighting plan that passes inspection and one that creates a rework headache mid-project.
6. Pick dimmers, color rendering, and smart controls that actually work
Not every dimmer works with every LED fixture, and mismatches show up as flicker, buzzing, or a dimmer that will not go below 20 percent. Always check the fixture or driver’s compatibility list against the dimmer model before buying either one, and note any minimum load requirements, since some LED-rated dimmers need a certain wattage to function properly.
Color rendering matters just as much as color temperature. Energy paying attention to CRI when choosing LED lighting, and a CRI of 90 or higher is worth prioritizing in kitchens, where accurate color rendering affects how food, produce, and finishes actually look.
Use LED-compatible or ELV dimmers matched to your specific fixture or driver.
Aim for CRI 90+ across all layers, especially task lighting near the stove and sink.
Keep ambient and pendant fixtures around 2700K to 3000K, and task fixtures 3000K to 3500K.
Consider smart switches for scene presets, useful for quickly shifting between cooking and entertaining modes.
Pro Tip: If you are installing smart switches, confirm they support your dimmer’s minimum load before the electrician finishes rough-in. Swapping a switch after drywall is a much bigger job than swapping it before.
7. Avoid the mistakes that show up on inspection day
Most kitchen lighting problems trace back to a handful of repeat mistakes, and catching them at the planning stage is far cheaper than fixing them after installation.
Lighting the floor instead of the counters, which leaves prep areas dim while the room looks bright overall.
Mixing color temperatures across layers without a plan, so pendants look yellow next to cool white task lighting.
Skipping dedicated task lighting entirely and relying on a single ceiling fixture for everything.
Wiring the whole kitchen to one switch, which kills the flexibility a layered plan is supposed to deliver.
Red flags to watch for in a contractor’s plan or quote include no mention of separate switching by layer, no dimmer compatibility noted for the fixtures specified, and no wiring detail for under-cabinet driver locations. A short checklist to bring to any planning meeting: confirm your lighting zones, fixture counts per zone, mounting heights, circuit assignments, dimmer types, driver placement, and a working budget range before anyone starts pulling wire.
8. Budget realistically and know who to hire for the job
Lighting costs vary a lot depending on fixture count, wiring complexity, and whether walls are open or finished. Typical installed ranges, based on industry cost data, include:
Recessed retrofit or new recessed cans: $150 to $250 each.
Under-cabinet lighting, hardwired: $300 to $800 installed.
Pendant fixtures: $200 to $2,000 or more, depending on the fixture and any canopy or ceiling work required.
Panel upgrades, when needed, vary widely based on your home’s existing service and load.
If your project is limited to swapping fixtures on existing circuits, an electrician alone can usually handle it. If lighting is part of a broader kitchen remodel involving new cabinetry, layout changes, or opened walls, a remodeling contractor who coordinates the electrician, cabinet installer, and inspector will keep the schedule and the wiring plan aligned. Either way, get a written estimate that lists fixture counts, dimmer and switch leg costs, and any permit or inspection fees separately, so you know exactly what you are paying for.
9. Why a coordinated lighting plan saves money later
Lighting mistakes are rarely about the fixtures themselves. They happen when the electrician, cabinet installer, and designer work from different assumptions about where switches, drivers, and valances go. Coordinating those three trades before rough-in is what keeps a lighting plan from turning into a change order once cabinets are hung and drywall is closed.
The coordination of lighting layout with cabinetry and electrical work should happen from the start rather than treating lighting as an afterthought bolted onto a finished layout. That sequencing is what keeps a lighting plan on schedule and on budget.
— Vlad
Get a lighting plan built into your kitchen remodel
A kitchen lighting plan works best when it is not a separate project bolted onto your cabinets after the fact. Layered lighting, wiring coordination with a licensed electrician, and fixture installation work best as part of a full kitchen remodel, so ambient, task, and accent layers get built into the layout instead of patched in later.

Bringing a rough floorplan, appliance locations, and preferred fixtures to a consultation helps in mapping out circuits, dimmers, and fixture placement alongside the kitchen design.
What you bring | What gets planned |
|---|---|
Rough floorplan | Fixture layout and footcandle targets by zone |
Appliance and sink locations | Task lighting placement and circuit needs |
Preferred fixture styles | Color temperature and dimmer compatibility |
Schedule a free estimate through Solution Team Remodeling or browse the full scope of services on the services page to see how lighting fits into your remodel.
Where these lighting recommendations come from
The footcandle targets, wiring rules, and placement specs in this guide are drawn from established lighting and code resources, including residential lighting guidance from USAI Lighting, NEC circuit requirements compiled by WireRef, under-cabinet wiring guidance from Ampora Labs, and LED efficiency and CRI recommendations from Energy.gov. For circuit-specific questions, a licensed electrician remains the authority on your local code requirements.
USAI Lighting: footcandle targets for ambient, task, and accent layers.
WireRef: NEC circuit and GFCI/AFCI requirements for kitchens.
Ampora Labs: under-cabinet wiring types and installation methods.
Energy.gov: LED efficiency and CRI guidance.
Sources
Kitchen Circuits for New Construction: Complete Checklist — WireRef
Under cabinet lighting wiring: Methods, Types & NEC Requirements — Ampora Labs
FAQ
What is the current trend for kitchen lighting?
Layered lighting with separately controlled ambient, task, and accent zones is the dominant approach, paired with warm color temperatures around 2700K to 3000K for ambient and pendant fixtures. Under-cabinet task lighting and pendant groupings over islands remain the most requested additions in kitchen remodels.
What are the trends in kitchen lighting for 2026?
Homeowners are increasingly asking for smart dimmers and scene controls that let one kitchen switch between a bright cooking mode and a dimmed entertaining mode. Warm, high-CRI LED fixtures and hidden valance or toe-kick accent lighting are also common requests during remodels.
What are the common kitchen lighting mistakes?
The most frequent mistakes are relying on a single ceiling fixture instead of layered lighting, skipping dedicated task lighting over counters, and mixing color temperatures across fixtures without a plan. Wiring the entire kitchen to one switch is another common error that removes the flexibility a layered plan is meant to provide.
Recommended
Back to Blog
